Image Synthesis Study 3
CycleGAN: An Image to Image Translation Tool
As part of 16-726 Learning-Based Image Synthesis at Carnegie Mellon University
credit: https://learning-image-synthesis.github.io/assignments/hw3
Overview
This study explores two algorithmic methods that automatically synthesize new images of cats based on features learned from a training set of existing cat images. The first method uses deep Convolutional GAN (DCGAN) to replicate cat images in the style of the training set. Image augmentation is also explored as a method to stabilize the model and improve training accuracy and speed. The second method uses the CycleGAN algorithm to synthesize a new image that shares similar content of an existing image but appearing in a different style. In this case, we explore a method to synthesize a new cat image that maintains the pose and content of an image of a gray cat (see “Part 2: CycleGAN” below) but created in the style of “grumpy cat”, as shown in image above. Cycle-Consistency loss is explored as a means of improving CycleGAN accuracy and speed.
Though this exploration focuses on cat images, both DCGAN and CycleGAN can be applied to any image content, including images of architecture. For example, CycleGAN can be used to transform a Frank Gehry building into the style of Zaha Hadid and vice versa, while DCGAN can create novel “designs” in any style. As is apparent by the significant advances in the field of image synthesis, especially in the realm of synthesizing or transforming near-realistic images of human faces, the significant impact and potential of these approaches within other disciplines becomes startlingly apparent.
Part 1: Deep Convolutional GANs // (DCGAN)
A simple image synthesis model
“In the first part, we will implement a specific type of GAN designed to process images, called a Deep Convolutional GAN (DCGAN). We will train the DCGAN to generate grumpy cats from samples of random noise.A DCGAN is simply a GAN that uses a convolutional neural network as the discriminator, and a network composed of transposed convolutions as the generator. To implement the DCGAN, we need to specify three things: 1) the generator, 2) the discriminator, and 3) the training procedure. We will develop each of these three components in the following subsections.” [2]
The DCGAN model architecture is made up of two major components. The generator, which synthesizes new images based on learned features from the training set and the discriminator which attempts to determine whether this new image is real (an original image from the training set) or fake (a new image synthesized by training set). As the model is trained, the generator tries to outsmart the discriminator by producing more accurate and realistic images in the style of the training set. It does this by updating its learned weights which result from loss factors derived from this generator-discriminator competitive interaction.
Step 1: Data Augmentation
DCGAN performs poorly without data augmentation on a small dataset because the discriminator can easily overfit to a real dataset. To fix this, we augment our data (ex. random crop and random horizontal flip) and add this to the training set, thus increasing the training sets size and diversity.

An example of image augmentation. First image in each row has been subsequently augmented 11 times, thus increasing the data set by 1100%.

Step 2: Constructing the Generator Model Architecture
Now, we will implement the generator of the DCGAN, which consists of a sequence of transpose convolutional layers that progressively upsample the input noise sample to generate a fake image. The generator in this DCGAN has the following architecture. [2]


Step 3: Constructing the Discriminator Model Architecture
The discriminator architecture is shown to the right. It incorporates the original 3 channel rgb image on the left which is progressively downsampled and analyzed via a series of transpose convolutional layers. The final and smallest layer (1x1x1) represents the final stage in the process where it determines whether the image it is analyzing is real or fake.


credit: https://poloclub.github.io/cnn-explainer/
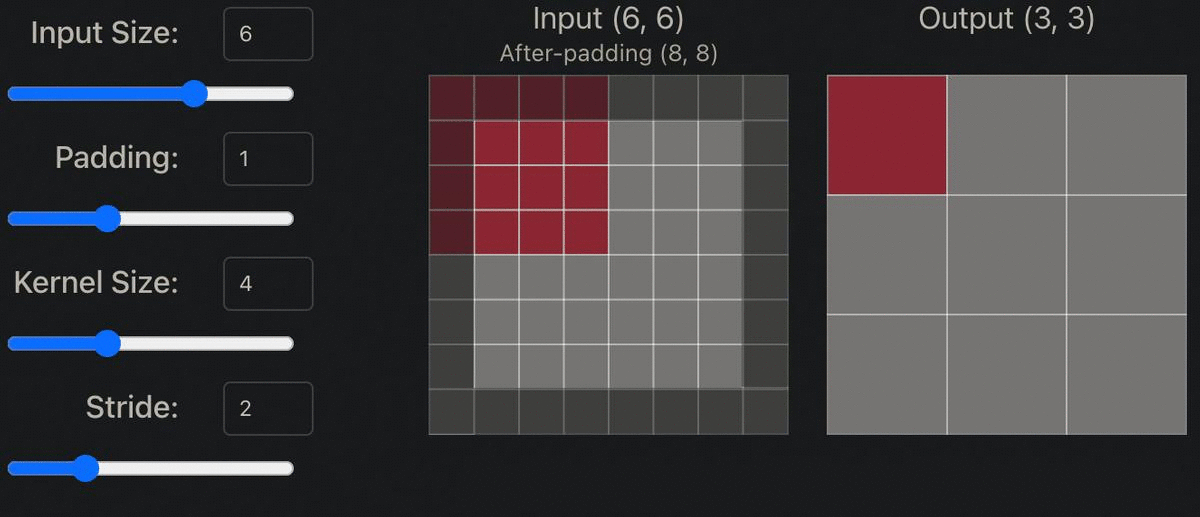
Step 4: Setting Model Hyper Parameters to Downsample & Upsample the Image
Within both the generator and discriminator model shown above, the original image is both downsampled and upsampled by a factor of two (ex. 64x64 -> 32x32). In order to do this, padding must be set to 1, kernel size to 4x4, and stride to 2. The appropriate padding amount can be determined by the following formula: Padding = ((S-1)*W-S+F)/2, with F = filter size, S = stride, W = width. So Padding = ((2-1)*8-2+4)/2. Thus, Padding = 1.
Stride: “Indicates how many pixels the kernel should be shifted over at a time.The impact stride has on a CNN is similar to kernel size. As stride is decreased, more features are learned because more data is extracted, which also leads to larger output layers. On the contrary, as stride is increased, this leads to more limited feature extraction and smaller output layer dimensions.” [1]
Padding: “Is often necessary when the kernel extends beyond the activation map. Padding conserves data at the borders of activation maps, which leads to better performance, and it can help preserve the input's spatial size, which allows an architecture designer to build depper, higher performing networks.” [1]
Kernel size: “Often also referred to as filter size, refers to the dimensions of the sliding window over the input. Choosing this hyperparameter has a massive impact on the image classification task. For example, small kernel sizes are able to extract a much larger amount of information containing highly local features from the input. As you can see on the visualization above, a smaller kernel size also leads to a smaller reduction in layer dimensions, which allows for a deeper architecture.” [1]
Step 5: Define the model training Loop
“Next, we will implement the training loop for the DCGAN. A DCGAN is simply a GAN with a specific type of generator and discriminator; thus, we train it in exactly the same way as a standard GAN.” [2] The basic structure for the training procedure is shown below.

DCGAN Results
The following results illustrate the importance of data augmentation and setting a high epoch count when training a DCGAN model. To begin, augmenting your data prior to training helps to achieve better results. By augmenting the dataset (ex. flipping, rotating, stretching the original image), you both increase the size and variety of images in the dataset, thus allowing the model to learn a wider variety of image features, thus creating a more robust and higher performing model. Finally, setting a higher epoch count (ex. 10,000 compared to 100) allows the model to train for a longer period of time and thus, identify, learn and recreate increasingly finer details and patterns found within the training set.

100 Epochs // No Image Augmentation
Not augmenting the images within the training set leads to increased generator and discriminator loss fluctuations and overall training instability. As there is less image data to train on, the model runs the risk of mode collapse and over fitting.

100 Epochs // Image Augmentation
Augmenting the images within the training set leads to increased training stability and reduced generator and discriminator loss fluctuations. As there is more image data to train on, the generator can learn finer and more varied features and patterns within the training set, synthesize higher quality images, and fool the discriminator more easily. This increases the models overall ability to learn and synthesize more accurate generations at a much more rapid and effective pace. Even after 100 epochs, generator and discriminator loss convergence and stability is quite apparent.

300 Epochs // No Image Augmentation
As the number of epochs increase without image augmentation, it becomes quite clear that the model is having a difficult time converging and stabilizing discriminator and generator loss scores. The lack of data variation and overall training examples makes it more difficult for the model to learn and re-create the images in new and unique synthesized images.

300 Epochs // Image Augmentation
After 300 epochs, it is quite clear that the discriminator and generator losses are approaching convergence and stabilization. Convergence implies that the GAN model found an optimum where large improvements (overall image shapes, composition, colour, etc) cannot be made anymore. Convergence is expressed in the accompanied loss graph (to right) when the D Loss and G loss converge and fluctuations are reduced. This means that an ideal and consistence generator and discriminator loss has been achieved and adequate training has occurred. That being said however, smaller and finer improvements (textures, smaller features, image details, etc) can still be made with further training and model optimization. By augmenting the dataset (ex. flipping, rotating, stretching the original image), you both increase the size and variety of images in the dataset, thus allowing the model to learn a wider variety of image features, thus creating a more robust and well performing model.
Part 2: Cycle GAN
An advanced image to image synthesis model
“In the second part, we will implement a more complex GAN architecture called CycleGAN for the task of image-to-image translation. We will train the CycleGAN to convert between different types of two kinds of cats (Grumpy and Russian Blue).” [2]

Step 1: Construct the CycleGAN Model Architecture
“The generator in the CycleGAN has layers that implement three stages of computation: 1) the first stage encodes the input via a series of convolutional layers that extract the image features; 2) the second stage then transforms the features by passing them through one or more residual blocks; and 3) the third stage decodes the transformed features using a series of transposed convolutional layers, to build an output image of the same size as the input. The residual block used in the transformation stage consists of a convolutional layer, where the input is added to the output of the convolution. This is done so that the characteristics of the output image (e.g., the shapes of objects) do not differ too much from the input.” [2]

Step 2: Implement the CycleGAN Training Loop
The CycleGAN training procedure is a bit more complex the standard “Vanilla” GAN training loop for the previous DCGAN . However, due to the symmetry in the training procedure (ex. all operations are done for both X → Y and Y → X directions), the implementation is not as challenging as initially expected. Code for both the X → Y and Y → X directions are the same but with X variables replaced by Y variables and vice versa. Similarly, both DCGAN and CycleGAN implement similar least-square error loss function when determining generator and discriminator loss, updating weights, and overall model training.

Credit: https://learning-image-synthesis.github.io/assignments/hw3
Step 3: Impliment Cycle-Consistency Loss to Improve Results
“The most interesting idea behind CycleGANs (and the one from which they get their name) is the idea of introducing a cycle consistency loss to constrain the model. The idea is that when we translate an image from domain \(X\) to domain \(Y\), and then translate the generated image back to domain \(X\), the result should look like the original image that we started with. The cycle consistency component of the loss is the mean squared error between the input images and their reconstructions obtained by passing through both generators in sequence (i.e., from domain \(X\) to \(Y\) viathe \(X \to Y\) generator, and then from domain \(Y\) back to \(X\) via the \(Y \to X\) generator). The cycle consistency loss for the \(Y \to X \to Y\) cycle is expressed as follows:” [2]
As shown in the results below, implementing cycle-consistency loss into the CycleGAN greatly improves results.

CycleGAN Results
The following results illustrate the importance of implimenting cycle-consistency loss within a CycleGAN model. Though perhaps not as apparent after 600 iterations, cycle-consistency loss ensures that translated image (X -> Y) can be translated back to the original image (Y -> X). If it does not, the model applies additional loss to help guide a seamlessly matching input and output image. The result of this, is an output image that perfectly matches the content of the input, though with a different style.

600 Iterations // No Cycle-Consistency Loss
After 600 iterations, the results of the CycleGAN without using cycle-consistency loss are apparent. Compared to the results below where cycle-consistency was used, the results in the experiment illustrate how the pose and content of the resultant cat image output do not always match the pose and content of the input photo. For example, a cats head might be pointing in a noticeably different direction than the cat in the input image. This problem is remedied as shown in the results below where cycle-consistency loss was used.

600 Iterations // Cycle-Consistency Loss
As explained above, cycle-consistency loss, when applied, greatly improves the consistency of content between the input and output image. As shown in the results above, the output cats head size, positioning, gaze-direction matches the input cat images much more accurately than the results above where cycle-consistency loss was not used.

20,000 Iterations // Cycle-Consistency Loss
After 20,000 iterations, the consistency between input and output content becomes more apparent. Again, this is due to the implementation of cycle-consistency loss and additional training time.

100,000 Iterations // Cycle-Consistency Loss
A final approx. 6 hour training session that ran through 100,000 iterations was carried out. Cycle-consistency loss was applied and the best results were achieved.
References
https://poloclub.github.io/cnn-explainer/
https://learning-image-synthesis.github.io/assignments/hw3